Thank You for That Really Important Gift
In the last year and a half, I have received generous gifts for two wedding showers, my wedding, two baby showers and my daughter’s baptism – not to mention all the other gifts we were given when our first baby was born. The outpouring of generosity was such an honor to my husband and me. It also amounted to writing a lot of thank-you notes!
In truth, it sparks a question when I think of all the love I was shown and all the thank-you cards I had to write. Namely, why did I have to wait for tangible gifts before I took the time to formally thank those who have loved me? The people who gave gifts over these last two years have been loyal family members and friends long before the arrival of wedding bells and baby rattles. For years, they have given me gifts that far exceed any items purchased off a registry.
How many of these people have been good listeners or have told me they were praying for me when I was going through a tough time? When did I ever take the time to thank them for the important gifts, the intangible blessings that come only from those who love as deeply?
Perhaps you have been in a desperate situation and God has worked through a friend or loved one to help see you through it. How often have people you know lit your soul when it was captive to grief, anxiety, frustration or depression? Maybe now is the time to thank them. It is never too late to thank your neighbor who has gone out of her way to love you. By thanking her, you love back. And in turn, you love God.
Creating and writing a handmade thank-you note is not only a great way to use your creative talents for someone you love, but to also show him just how much you appreciate what he’s done. So, why not go the extra mile and make them instead of buying them? After all, your loved one has gone the extra mile for you.
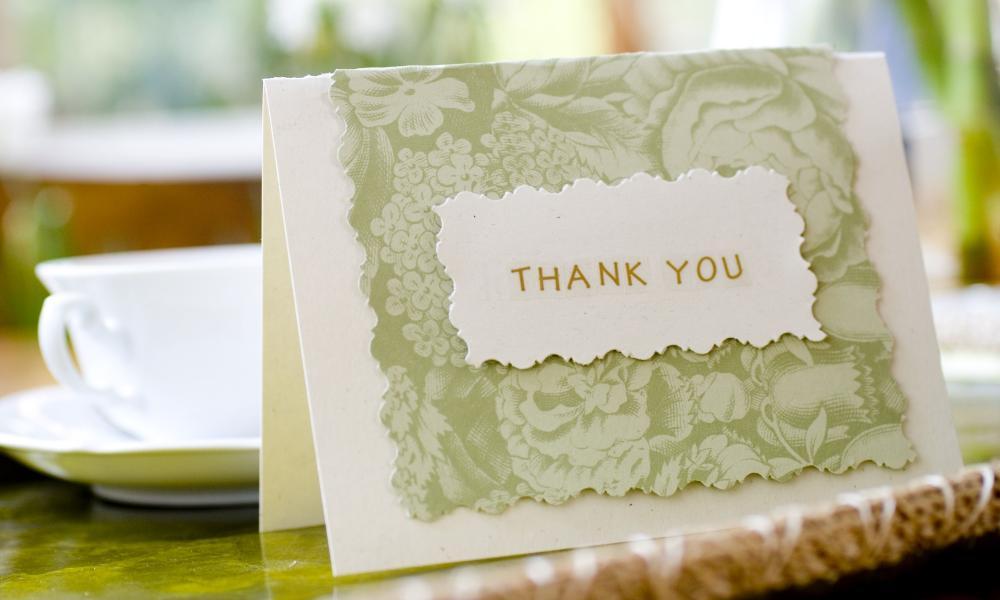
For the project shown, you will need the following:
• One 8 1⁄2” x 11” piece of off-white card stock
• One 8 1⁄2” x 11” piece of light green card stock
• Decorative-edge scissors
• One pack of adhesive letters (in the scrapbook supply section of an arts and crafts store)
• Glue
• One standard invitation size (4 3/8” x 5 3⁄4” ) envelope for sending
Fold and crease the 8 1⁄2” x 11” piece of off-white paper in half. Gently tear along the line of the crease (if you wish to have a cleaner edge, cut 1/16” off of the torn edge with a utility knife and ruler). You will now have two 5 1⁄2” x 8 1⁄2” pieces of off-white paper. Take one of those and fold in half again with the ends aligned to form the card. Set aside. Use decorative-edge scissors to cut a light green piece of paper 1” smaller than the 5 1⁄2” x 8 1⁄2” piece you just folded in half. Fold that piece of paper in half until the ends are aligned. Glue the piece over the off-white card. Set aside. Using the decorative-edge scissors, cut a 1” x 3” piece from the remaining off-white paper and glue in the center of the light green part of the card. Adhere the letters on that piece of paper.
More ideas ...
• Spruce up handmade cards using different textures of paper.
• Glue on metal charms (found in the jewelry-making supply section of an arts and crafts store).
• Try using a rubber stamp or calligraphy pen for an alternate way to spell out the words, “thank you.”